Friday 4 September 2015

LLK Library Cardi Blog Tour


What's not to love about the cool, crisp air, the crunch of beautiful, colorful leaves and pumpkin spice everything?! We are gearing up for Fall and savoring every bit of this beautiful weather before we experience nearly 6 months of Winter. Eek!

I love when the seasons change! It's a chance to sew up new clothes and stock the wardrobe for the coming weather. This week I got to make the new Library Cardigan by Cassie with Little Lizard King! LLK was my first PDF love, and it is always exciting to sew one of their patterns! This new pattern definitely did not disappoint!

Let's talk about the details. This patterns ranges from a size 12 months to a size 14 in girls.  You'll find detailed instructions, cutting charts, pictures and pattern pieces to use when sewing with knit fabrics to make this oh so cute cardi.

I chose to use Art Gallery Fabrics knits from the Skopelos line by Katarina Roccella.  The purple dot fabric is from Euro Girls Boutique.


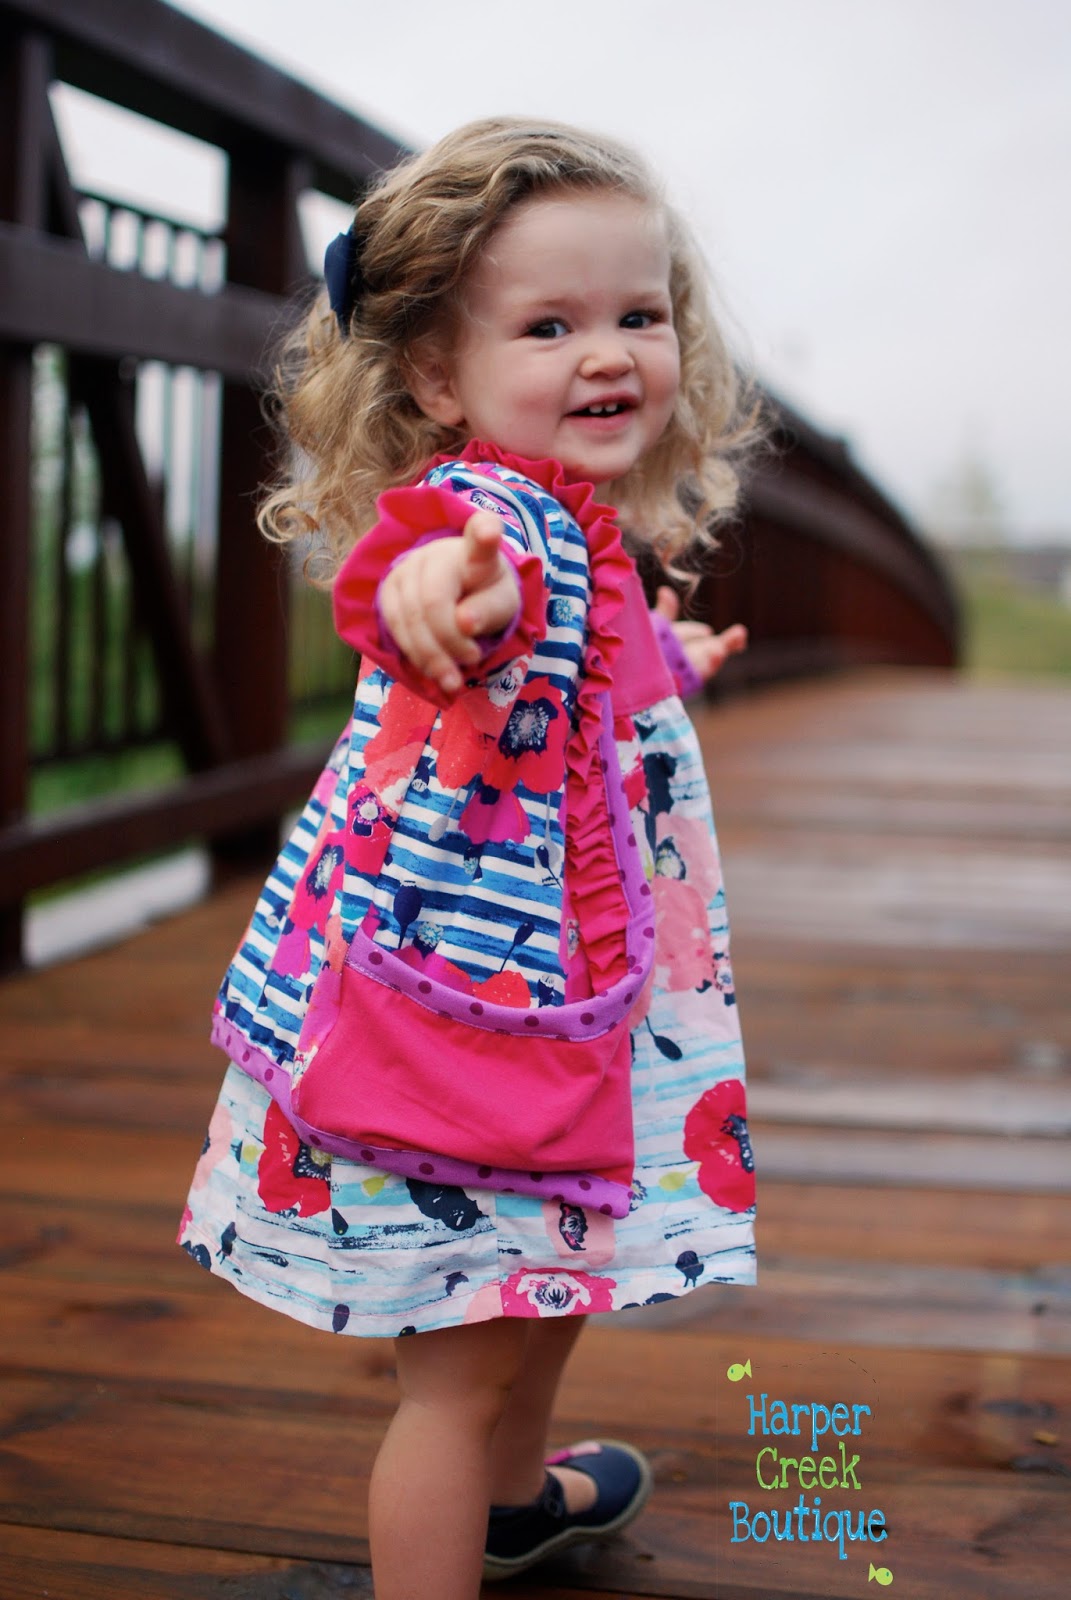
I'm a ruffle lovin' girl, and I thought they would add a cute little touch to the Library Cardi. I multiplied the width measurement of the sleeve binding by two to get my ruffle width and I used a length of 1.5". I ruffled each of the sleeve ruffle strips with my serger. (Thank goodness for that ruffle foot!!)


I followed the "Alternate Method" of adding the sleeve binding on page 13 of the Library Cardi Pattern.  Next, I sewed the ruffle onto the sleeve, right sides together, matching the ruffled end with the raw edge of the sleeve.

Sew the binding onto the sleeve right sides together. Keep in mind the ruffle will be sandwiched between the sleeve and sleeve binding. Sew up the side seams of the sleeves and they are finished!

For the neckband binding, I cut my ruffle strips 1.5" long and multiplied the width of the neckband binding by two to get the ruffle strip width. After my neckband binding was sewn onto the wrong side of the cardigan, I clipped the binding to the right side of the fabric (page 19 in your tutorial).  I slid the ruffle strip in between the cardigan and the binding. The ruffle strip doesn't need to go to the end of the cardigan because of the way the pockets will be made. I did have extra ruffled fabric, which I cut off. 


Sew the binding closed, and you have added ruffles to your Library Cardigan! 


Big hugs and a huge thank you to Cassie and LLK for letting me be a part of the Library Cardigan blog tour!

P.S. Brylee is wearing her Road Trip Racerback by Little Lizard King under her cardi :)

Happy sewing!

Kimberlee

Tuesday 9 June 2015

LLK Pocket Romper Blog Tour

The Pocket Romper by Little Lizard King is FINALLY here! This oh so cute romper went into testing int the fall, but with cold weather quickly approaching the team decided to wait to release until this summer. I'm always so excited to share my pictures and now I get to do that! Here are a couple I made in the fall:

Pocket-less version- This one is SUPER quick!


Version with Pockets


The Pocket Romper is for sizes 0-3 months to 3t and includes a pattern for an 18' doll! It features real pockets, flutter sleeves, an elastic back bodice, and shirred or elastic leg openings.  The romper has a convenient snap tape crotch to make diaper changes a breeze! Consistent with all Little Lizard King patterns, you'll find detailed instructions and photos, and charts for fabric requirements, size measurements, and cutting measurements.  It's time to reveal the romper I made for this blog tour! I used Free Spirit's line of fabrics called Slipper Roses (Country in Blue) for this vintage-y, sweet Pocket Romper!


  Picture overload! Haha! Sorry I couldn't help it! This romper is just TOO cute! I LOVE rompers. If I could dress my daughter in a romper every day of the year, I probably would. After all, those little chubby legs are only going to be chubby for so long! I need to gush over them all I can!  The Pocket Romper is definitely going to be a staple in our summer wardrobe! Each day one lucky winner will be chosen to win a pattern from Little Lizard King! Woohoo!  Enter here:


a Rafflecopter giveaway

Happy sewing!

Kimberlee
Harper Creek Boutique
Blog

Saturday 30 May 2015

Cole's Corner and Creations: Dive into Swimsuits


Welcome to day 4 of the Dive into Swimsuits Blog Tour hosted by Cole's Corner and Creations! If you know anything about Nicole (owner of Cole's Corner and Creations) you know she LOVES sewing swimsuits and leotards AND she is amazing at creating ones that look like characters! Well, when I was asked to be a part of this tour, I knew I wanted to create something that would make Nicole proud. I used her All 4 One swimsuit pattern (which is on sale for a whopping $3!) to create Snow White! 


This was my third swimsuit to make. Although this is the "hardest" swimsuit pattern from CCC, I truly believe a beginner can do it! As long as you can sew a zig zag stitch and have some patience, dive in!


The All 4 One bathing suit has FOUR options. I chose the "Pin Up" and just moved the buttons on the waistband instead of below the waistband.  This pattern ranges from sizes 1-5 and include detailed instructions on how to pick out the correct materials and which needles and stitches to use.


 This was my first time adding a lining to a swimsuit. I usually just skip in since Brylee has to wear a swim diaper anyways, but I thought it would be fun to learn....and what a more perfect time than during this blog tour! The purpose of the liner is to give extra protection in areas where girls need it most. You can use swimsuit liner material or extra swimsuit fabric for this piece.


The trickiest part of sewing swimsuits is the binding.  An easy way to describe the way binding is folded on a swimsuit is like double fold bias binding is folded. The only problem is that you don't want to iron swimsuit fabric. I used Clover Wonder Clips to hold my folded fabric in place. I highly recommend these!  


It's time for you to go fabric shopping (who can turn that down?!), specifically for swimsuit fabric, and get started!! Cole's Corner and Creations has a swimsuit sewalong running from May 27 to June 3. You can also check out the other bloggers posts here


 Just for fun, check out the difference a year makes in my sweet girl's thighs! Haha! The left is a swimsuit I made last year. :)


Happy sewing!!

Kimberlee

PS: Check out the flyers below to find out more about the Dive into Swimwear sewalong and blog tour!


Saturday 23 May 2015

Everyday Character Sewing Contest: Jesse


Yodel-ay-ee-hoo! It's FINALLY time to share my version of Jesse from the fabulous movie, Toy
Story.  When I first read that Pattern Revolution was hosting the Everyday Character Sewing Contest, I racked my brain (and some of my family's and friend's brains too) and made a huge list of possible characters I wanted to create. I kept coming back to Jesse, and once I saw the Lily Lapel dress from the Simple Life Pattern Company, all I could think was "It's you! It's you! It's you!"(as quoted from Jesse)!


 I purchased the denim chambray and cotton solids from Joann Fabrics, and I found the brown fabric in my stash. For the red detail on the top, I used a red fabric marker. I originally tried 1/8" red ribbon, but it didn't achieve the look I was going for.


Head on over to Pattern Revolution to vote for Jesse! Just click the heart next to our picture! Thanks in advance for your support!


So long partners,

Kimberlee